Quilling a Skull
- Oct 27, 2018
- 3 min read
Calling all quill seekers. With Cinco de Mayo just around the corner what better project to create than this Day of the Dead style quilled skull.
Made from strips of paper which are curled, shaped and stuck down, this paper craft could not be simpler. Once you get the hand of easy this technique is you'll be quilling all sorts of wonderful creations.
You will need:
A4 piece of foam board
Scrap card
Thin card or paper in bright colours
Long ruler
Craft knife
Scissors
Cutting mat or equivalent
PVA glue
Pencil
Cocktail sticks
Mini pegs or bulldog clips

1 Either draw a skull shape freehand, or print one from your computer, and use to cut out a template from thin card. Position the template onto the centre of the foam board and draw round with a pencil.

2 Mark 1.5cm down on opposite ends of a piece of thin card. Place your ruler onto the marks and use a sharp craft knife to cut a strip of paper. Cut strips from all of the different coloured card.

3 Take a strip of green card and place a cocktail stick over one end, curl the paper round the stick and tuck the end under so it catches. Keeping your thumb and forefinger on the coil, start turning the cocktail stick round a few times.

4 Apply a little PVA glue to one edge, using a cocktail stick. Carefully place the green strip of paper over the pencil skull. You will need to hold it in place for a few seconds so the glue adheres to the board.

5 Take your second green strip, place it close to the first, then cut to the right length and glue in place as before.

6 Take the excess, cut from the second piece, and use to create the jaw of the skull.

7 Have a practice making up some coils. Once you have the hang of it, make up two bright pink coils for the eyes. Place on the skull, but don't glue anything down yet.

8 To make the nostrils, curl two mint green coils and glue. Pinch one end to create a teardrop shape.

9 Cut off some of the ends of paper to create loops of various sizes, start positioning them onto the skull.

10 Cut a 4cm length of green card and stick in place, just below the nostrils, for the mouth.

11 Cut eight 2cm strips of lilac card. Curve the pieces with your thumb and forefinger, then carefully position above and below the mouth to create teeth. You may find using tweezers will help as it can get quite fiddly.

12 Make a concertina from pale pink card, then continue making coils playing around with different shapes. Once you have a good selection position them onto the picture - but don’t glue anything down just yet. Keep building up the design, coiling more if you need.


13 Once you are happy with the positioning, apply a little glue to the edges of the strips with a cocktail stick and secure everything in place. And, voila! You're very own masterpiece!
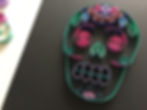
And there you have it, a pretty stylish Cinco de Mayo and Day of the Dead quilled skull! I'd love to see your creations, please find me on Instagram and tag me!


AND....if you enjoyed this project, how about checking out my blog post on How to Marble Paper


